I've never thought of eating pancakes with pineapple syrup!!!! But doesn't it sound yummy!!!!!!!!!!!!
click HERE for recipe at Cooking Tip of the day
Showing posts with label food. Show all posts
Showing posts with label food. Show all posts
Sunday, February 28, 2010
Monday, January 18, 2010
I have to make these!
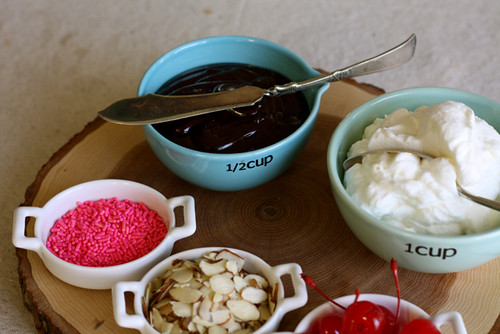
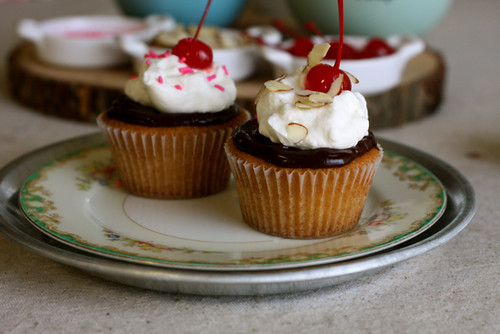
Hot Fudge Sundae Cupcakes
Vanilla Cupcakes:
from The Hummingbird Bakery Cookbook
makes 12 cupcakes
Print this Recipe!
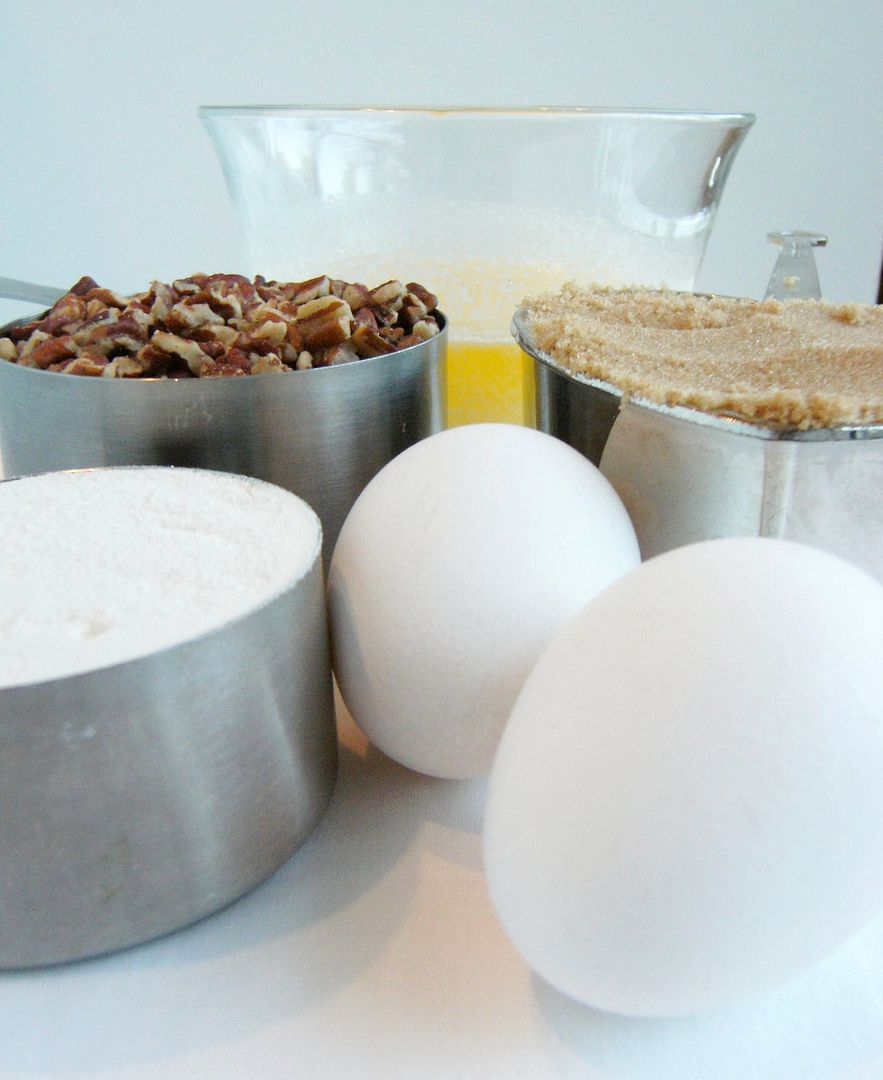
1 cup all-purpose flour
a scant 3/4 cup sugar
1 teaspoon baking powder
1/2 teaspoon baking soda
pinch of salt
3 tablespoons unsalted butter, at room temperature
1/2 cup whole milk
1 egg
1/2 teaspoon vanilla extract
Preheat oven to 350 degrees F.
Put the flour, sugar, baking powder, baking soda and butter into the bowl of a stand mixer fitted with a paddle attachment, or use a handheld beater and beat on slow speed until the mixture is a sandy consistency and everything is combined. Gradually pour in half of the milk and beat until the milk is just incorporated.
Whisk the egg, vanilla and remaining milk together in a separate bowl for a few seconds, then pour into the flour mixture and continue beating until just incorporated. Scrape any unmixed ingredients from the side or the bottom of the bowl with a rubber spatula. Continue mixing until the batter is smooth. Just a few minutes. Do not overmix.
Spoon the batter into paper lined muffin tins, dividing between the 12 cups. Bake for 20-25 minutes or until light golden and a skewer inserted in the center comes out clean. Let the cupcakes cool slightly in the pan, then turn them out onto a wire rack to cool completely before frosting.
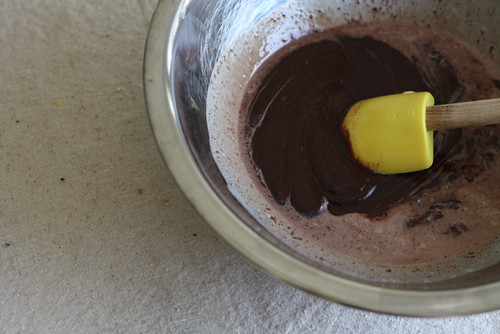
Chocolate Ganache:
3/4 cup mini semisweet chocolate chips (I used chocolate chunks)
1/4 cup heavy cream
Put chocolate chips in a small bowl. Bring cream to a simmer in a small heavy saucepan. Pour cream evenly over chocolate. Let stand for one minute to soften, then stir until smooth. If frosting is too loose to spread, let it sit at room temperature for 10 to 30 minutes, stirring occasionally, frosting will continue to thicken as it stands.
Top vanilla cupcakes with chocolate ganache, slightly sweetened whipped cream, slivered almonds and a cherry.
Serve immediately.
Hot Fudge Sundae Cupcakes
Vanilla Cupcakes:
from The Hummingbird Bakery Cookbook
makes 12 cupcakes
Print this Recipe!
1 cup all-purpose flour
a scant 3/4 cup sugar
1 teaspoon baking powder
1/2 teaspoon baking soda
pinch of salt
3 tablespoons unsalted butter, at room temperature
1/2 cup whole milk
1 egg
1/2 teaspoon vanilla extract
Preheat oven to 350 degrees F.
Put the flour, sugar, baking powder, baking soda and butter into the bowl of a stand mixer fitted with a paddle attachment, or use a handheld beater and beat on slow speed until the mixture is a sandy consistency and everything is combined. Gradually pour in half of the milk and beat until the milk is just incorporated.
Whisk the egg, vanilla and remaining milk together in a separate bowl for a few seconds, then pour into the flour mixture and continue beating until just incorporated. Scrape any unmixed ingredients from the side or the bottom of the bowl with a rubber spatula. Continue mixing until the batter is smooth. Just a few minutes. Do not overmix.
Spoon the batter into paper lined muffin tins, dividing between the 12 cups. Bake for 20-25 minutes or until light golden and a skewer inserted in the center comes out clean. Let the cupcakes cool slightly in the pan, then turn them out onto a wire rack to cool completely before frosting.
3/4 cup mini semisweet chocolate chips (I used chocolate chunks)
1/4 cup heavy cream
Put chocolate chips in a small bowl. Bring cream to a simmer in a small heavy saucepan. Pour cream evenly over chocolate. Let stand for one minute to soften, then stir until smooth. If frosting is too loose to spread, let it sit at room temperature for 10 to 30 minutes, stirring occasionally, frosting will continue to thicken as it stands.
Top vanilla cupcakes with chocolate ganache, slightly sweetened whipped cream, slivered almonds and a cherry.
Serve immediately.
Sunday, January 17, 2010
Saturday, January 16, 2010
I want to make this....I find such good recipes at Eat at Home all the time. And I love her pictures.

Here’s what you’ll need:

- 2 cups sugar
- 3 cups flour
- 1 1/2 tsp. cinnamon
- 1 tsp. baking soda
- 1 tsp. salt
- 3 eggs, beaten
- 1 cup oil
- 1 cup crushed pineapple, undrained
- 1 cup grated carrot (2-3 carrots)
- 2 tsp. vanilla
- 1 cup nuts, optional
The ingredients call for only 1 cup of crushed pineapple. I could only find a 20 oz can. I just dipped 1 cup out with a spoon. The rest could be used in another recipe or fruit salad.

Friday, January 15, 2010
These are easy and Yummy!
Mini Pecan Pie Muffins
(recipe courtesy of Jane Doiron, Make-Ahead Meals)
1 c light brown sugar
1 c pecans, chopped
1/2 c flour
2/3 c butter, melted
2 eggs, beaten
Spray 20 mini muffin cups with nonstick spray (I used butter); set aside. Preheat the oven to 350.
In a medium bowl, mix all of the ingredients together. Spoon the batter into the muffin cups evenly.
Bake for 18-20 minutes. The edges will be crispy. Do not overbake. Remove the muffins and cool on a wire rack.
~Freeze~
When the muffins are completely cool, place them in a freezer bag and freeze up to 2 months.
Thursday, January 14, 2010
i love avacados
this is something good to eat when i just feel like having a snack.


Easy Guacamole
- 1 ripe avocado
- 2 tbsp. chopped jalapeno
- salt to taste
Directions:
- Cut the avocado in half and remove the pit.
- Scoop out the inside and mash.
- Combine mashed avocado with other ingredients.
- Serve with corn chips
Candy
I want to make these! Found at The Cooks Next Door


12 oz. can of salted peanuts
6 oz. Semi-sweet Chocolate chips
6 oz. Butterscotch chips
2 oz. White Chocolate or vanilla chips
Milk or cream
6 oz. Semi-sweet Chocolate chips
6 oz. Butterscotch chips
2 oz. White Chocolate or vanilla chips
Milk or cream
Melt the semi-sweet and butterscotch chips in the microwave. Stir in peanuts and drop on waxed paper. Melt white chocolate chips with a splash (less than a tsp.) of cream or milk to thin and drizzle over finished clusters.
(I often double this recipe and use 2 cans of peanuts, 1 whole bag of semi-sweet chips and 1 whole bag of butterscotch chips – I think they are 11 oz. each.).
Saturday, January 9, 2010
How to Blanch and Freeze Green Beans!
How to Blanch and Freeze Green Beans!: "
found at The Notebook
1. Pick your green beans and clean them thoroughly.
2. Pick off the end of the green bean that was attached to the stem. Some people remove both ends and also snap the bean into several pieces, I have found that snapping off only the one end and keeping the rest of the bean whole will preserve more of the juiciness and crispness of the bean.
3. Boil for 5 minutes (called blanching). This partially cooks the beans but more importantly kills any bacteria that will cause the beans to rot. To do this,get a large pot of water up to a rolling boil. Boil small to medium sized batches of beans at a time (assuming you have a large amount to boil). I like to do my beans in a bunch of small to medium sized batches that way when I bag them for freezing they are in good portion sizes. I like to use a “pasta pot” or a steam pot for boiling my beans. These are deep pots that have a separate steaming or strainer section in them that you can lift your vegetables out of the boiling water instead of dumping the water. Other options are, to scoop out the beans with a slotted spoon, dump the boiling water and vegetables through a colander into another pot, or dump out the boiling water into the sink through a strainer and start a new pot of water boiling.
4. Immediately after you take the beans out of the boiling water, you need to put the hot beans in a “cold bath”. I typically create a cold bath by getting a large bowl or deep pan and fill it with cold water and ice. Then simply dump the hot beans in and mix around to thoroughly chill the beans. This rapid cooling will stop the bean from cooking internally and help preserve some of the texture “crispness” of the bean. You will want to cold water bathe them for the same amount of time that they were boiling. In my case that is 5 minutes.
5. Remove the beans from the cold water bath, strain them, then bag them for freezing. I know some people like to lay the beans out to dry off before they freeze them. I have done this both ways and don’t recognize any glaring differences in eating the final product.
A few things to remember.
1. Use freezer bags. They are thicker and typically seal up better. Freezer bags will often have spaces on the outside to write the contents of the bag in, which brings me to number 2.
2. Label what is frozen and when you froze it. This way, when you are in your freezer grabbing bags of beans to eat, you can grab the oldest ones first.
3. Try to get all of the air out of the bag before sealing, whether you do this by sucking the air out of the bag (as I do) or pressing the bag to empty the air. The systems that suction pack your produce in bags are a great investment.
4. To cook your beans. Simply get a pot of water (large enough to handle the number of beans you are thawing) up to boil and empty the still frozen beans into it. Approximately 5 minutes of boiling should be sufficient. Then strain and serve the beans. Of course during the cooking and straining portions of this process you can add seasonings of your choice. I like to add butter and garlic salt into the boil with my beans. Adding the butter may not be healthy but they taste wonderful.
5. Enjoy!
"
Triple Chocolate Muffins
Triple Chocolate Muffins:
I like the idea of frezzing foods to later give to my two kids that are in college. I found this at Freeze Happy.
There are some important things you need to know about food safety if you really want to dive into Freezer Cooking go HERE to learn more.

TRIPLE CHOCOLATE MUFFINS
Yield: 12 muffins
5 ounces Semisweet Chocolate
2 Baking Chocolate Squares
1/3 cup Butter
3/4 cup Sour Cream
2/3 cup Brown Sugar - packed
1/4 cup Light Corn Syrup
1 Egg
2 teaspoons Vanilla
1 1/2 cups Flour
1 teaspoon Baking Soda
1/4 teaspoon Salt
1/2 cup Chocolate Chips - semi-sweet or milk
To Prepare
- Mix semisweet chocolate, baking chocolate, and butter together, then melt carefully in microwave or over simmering water in double boiler. Allow to cool to lukewarm.
- Mix sour cream, sugar, corn syrup, egg and vanilla. Blend with melted chocolates. Blend flour, soda and salt, then add to the chocolate mixture and blend very well. Add the chocolate chips.
- Pour batter into 12 paper-lined or greased muffin tins.
- Bake in preheated 400 degree F oven for about 20 minutes. Remove from muffin tins and allow to cool on wire racks.
To Freeze
Cool completely, then freeze in individual baggies, removing as much air as possible from each baggie before sealing.
To Serve
Reheat in microwave for 15-20 seconds or until just slightly warm.

"
I like the idea of frezzing foods to later give to my two kids that are in college. I found this at Freeze Happy.
There are some important things you need to know about food safety if you really want to dive into Freezer Cooking go HERE to learn more.
TRIPLE CHOCOLATE MUFFINS
Yield: 12 muffins
5 ounces Semisweet Chocolate
2 Baking Chocolate Squares
1/3 cup Butter
3/4 cup Sour Cream
2/3 cup Brown Sugar - packed
1/4 cup Light Corn Syrup
1 Egg
2 teaspoons Vanilla
1 1/2 cups Flour
1 teaspoon Baking Soda
1/4 teaspoon Salt
1/2 cup Chocolate Chips - semi-sweet or milk
To Prepare
- Mix semisweet chocolate, baking chocolate, and butter together, then melt carefully in microwave or over simmering water in double boiler. Allow to cool to lukewarm.
- Mix sour cream, sugar, corn syrup, egg and vanilla. Blend with melted chocolates. Blend flour, soda and salt, then add to the chocolate mixture and blend very well. Add the chocolate chips.
- Pour batter into 12 paper-lined or greased muffin tins.
- Bake in preheated 400 degree F oven for about 20 minutes. Remove from muffin tins and allow to cool on wire racks.
To Freeze
Cool completely, then freeze in individual baggies, removing as much air as possible from each baggie before sealing.
To Serve
Reheat in microwave for 15-20 seconds or until just slightly warm.
Food
I don't like cooking very much and I often don't know what I want to eat. I like the idea of having cooked meat ready to make it just a little easier for myself. I found this post on Eat at Home.
Place boneless chicken breasts still frozen in a casserole dish, cover it tightly with foil and bake at 350 degrees for 1 1/2 – 2 hours. Add a little water on the chicken before covering it with foil, do the same thing with chicken that has bones.
Once cooked, pull meat apart with a fork. Cool meat before freezing, then place meat in ziplock bags in 2-3 cup quantities.
For ground meat, like hamburger or sausage, I brown it on the stove top. Rinse it under very hot water to remove the grease. Freeze in ziplock bags. Sometimes I brown diced onion with it.
Steaming ground beef using a large spaghetti pot how-to from Tami's Tips and Tricks
 Click HERE for instructions.
 Wash and peel your potatoes and then dice them into small cubes (the larger they are, the longer they take to get tender...so make them about an inch or smaller in size)
Place boneless chicken breasts still frozen in a casserole dish, cover it tightly with foil and bake at 350 degrees for 1 1/2 – 2 hours. Add a little water on the chicken before covering it with foil, do the same thing with chicken that has bones.
Once cooked, pull meat apart with a fork. Cool meat before freezing, then place meat in ziplock bags in 2-3 cup quantities.
For ground meat, like hamburger or sausage, I brown it on the stove top. Rinse it under very hot water to remove the grease. Freeze in ziplock bags. Sometimes I brown diced onion with it.
Steaming ground beef using a large spaghetti pot how-to from Tami's Tips and Tricks
Click HERE for instructions.Sweet Potato Preparation
@Tami's Tips and Tricks
Wash and peel your potatoes and then dice them into small cubes (the larger they are, the longer they take to get tender...so make them about an inch or smaller in size)
 Click HERE for instructions.

Subscribe to:
Posts (Atom)